Vision -Licence Checking
Wednesday 05 February 2025
Vision Licence Checking gives you full control over your employee’s licence checks. The feature makes it simple to schedule your checks and see your results by:
- Including a full onboarding process all done in Vision
- Giving you clear visibility of your results in the Licence Hub
- Signposting you to issues through configurable licence check alerts
- Allows you to create your own check policies determining how frequently employees’ licences are examined
- Giving those with the relevant permissions the ability to purchase licence check credits online
- Allowing you to set specific user permissions around visibility of licence checking results.
Preparing Vision if you only use Licence checking
Vision Licence Checking can be enabled as a stand-alone feature; however, you will need to add your drivers and users.
To find out how to add users click here
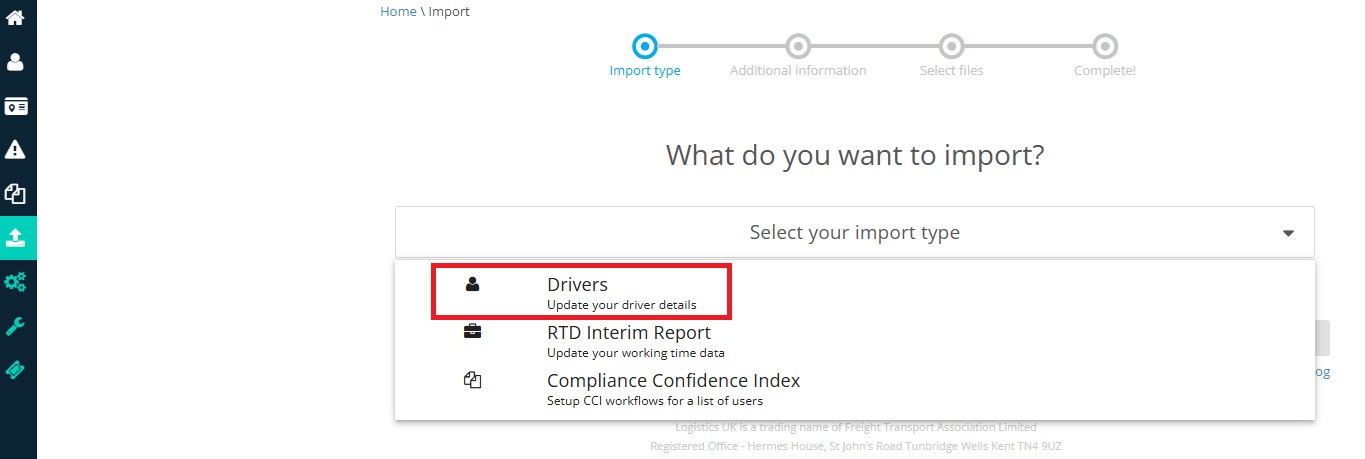
To add drivers, select the import icon:
From the dropdown menu select drivers:
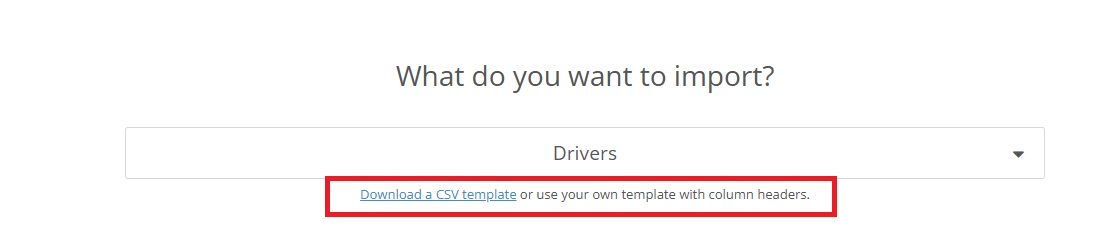
Here you will see a link to a template:
Complete the mandatory fields highlighted in the “Read Me” file and save in CSV format:

Select “Next” on the import page which will take you to the import page where clicking “Choose File” will allow you to select the file and upload it:
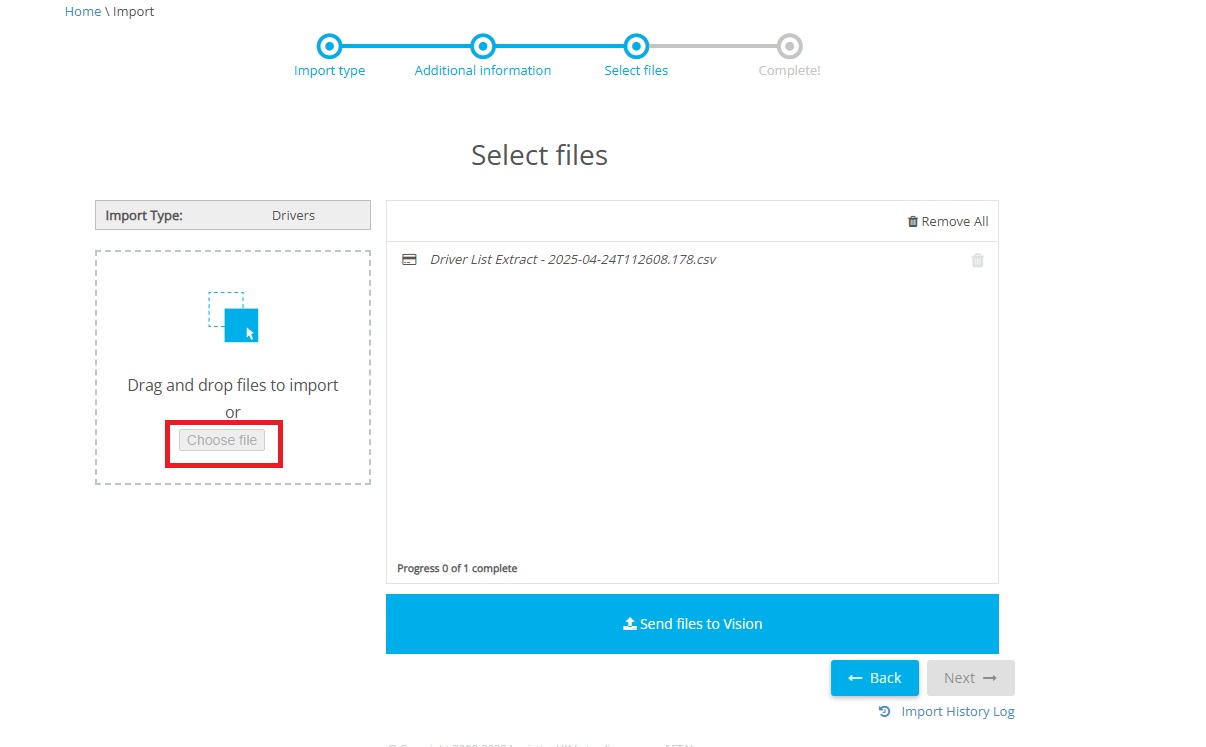
Click “Send files to Vision” to upload your drivers. Once uploaded they will appear in the Manage my Drivers- Driver List page:
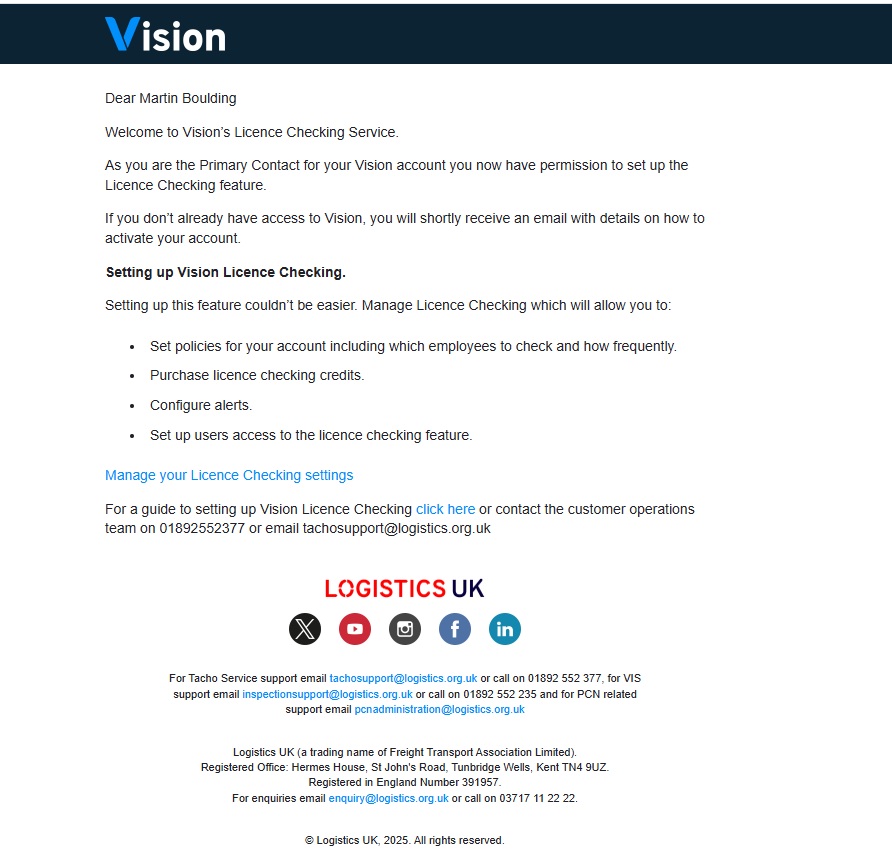
Setting up Vision Licence Checking
Once the Licence Checking feature is enabled, the Primary Contact user will receive an email:
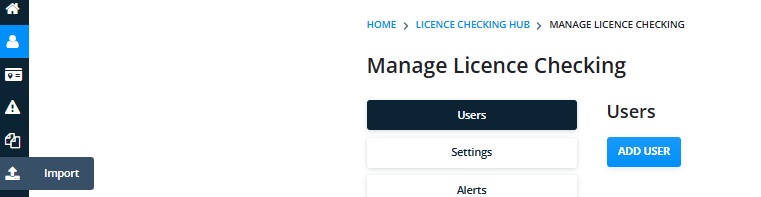
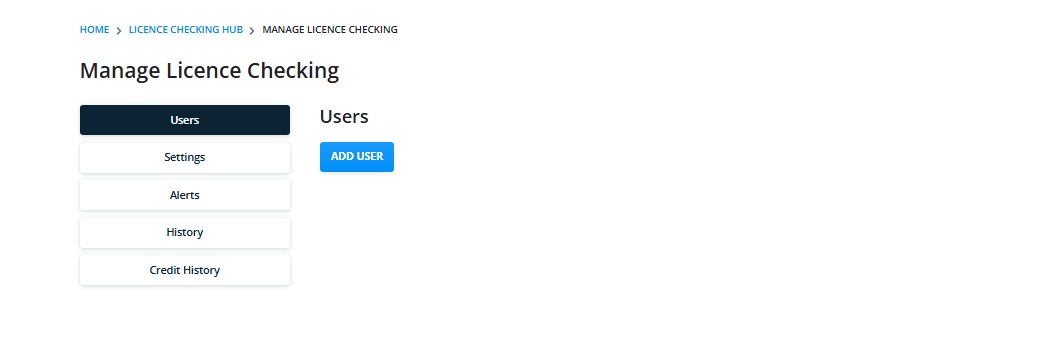
Manage Licence Checking
Click the link to “Manage your Licence Checking settings”, which, provided you are logged into Vision will take you to the page illustrated below:
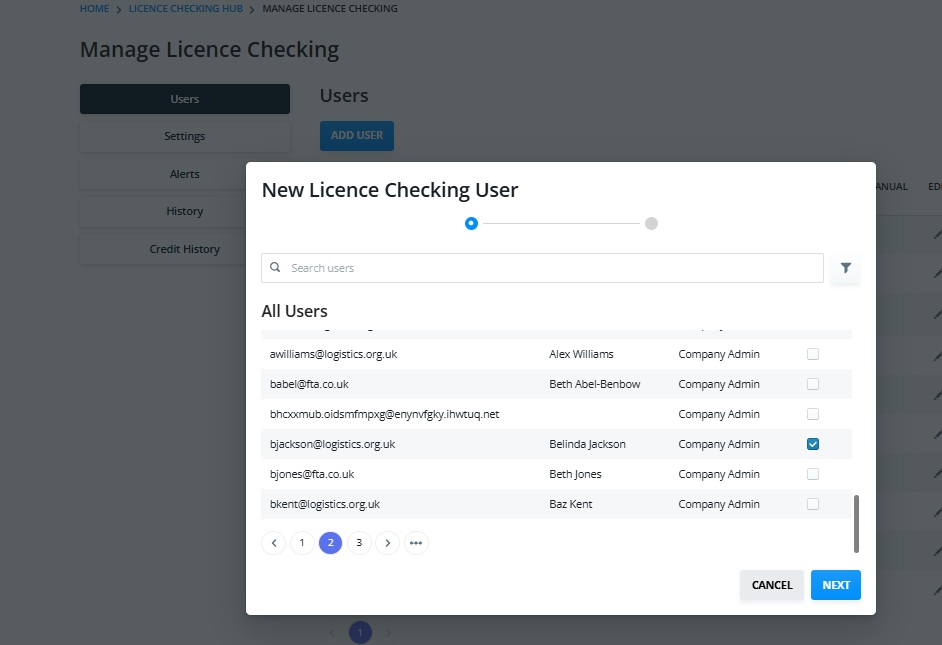
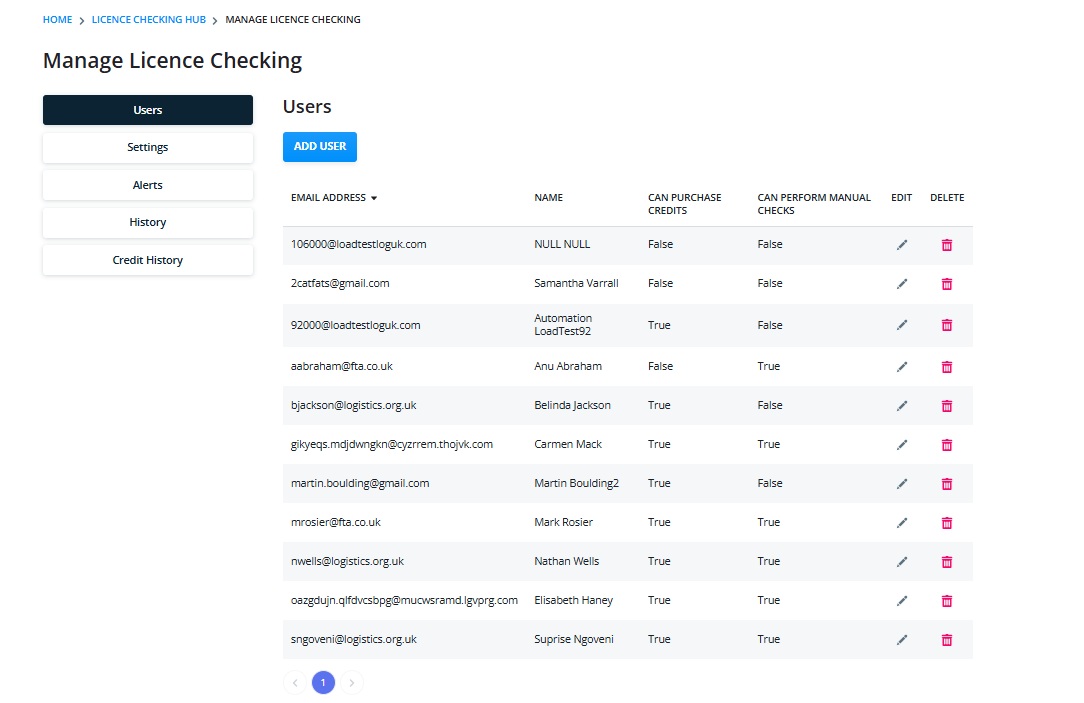
Select “Add User” and choose a user from the list that you would like to have access to Licence Check information:
Click “next” and select the additional permissions to purchase licence check credits or perform manual licence checks, i.e. one-off checks outside of the normal checking policy. These additional permissions should be restricted to a limited number of users:
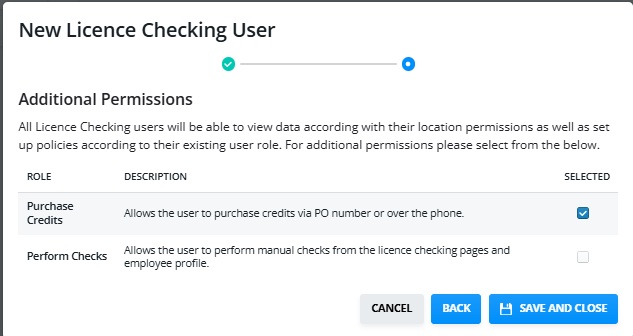
Click “Save and Close” to display your user list where you can edit or delete users:
Next select “Settings” to choose the general way you would like the system to perform:
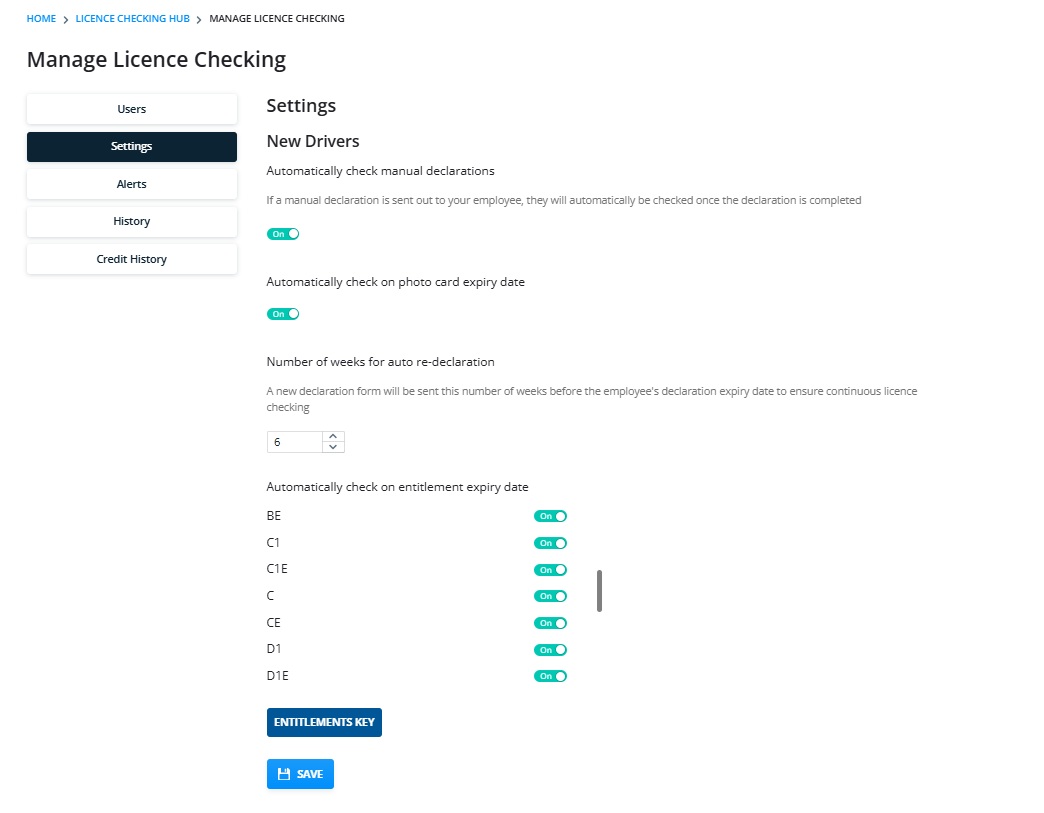
Automatically check manual declarations -Allows a “one off” declaration to be sent to a driver who is not part of a general policy. Once the form is returned, their licence will automatically be checked.
Automatically check Photo card expiry date- Allows extra checks to take place every 28 days until the photo card is valid.
Number of weeks for auto re-declaration- Allows you to specify how many weeks before a drivers declaration expires that you would like a new one sending out.
Automatically check on entitlement expiry date-Allows extra checks to take place every 28 days until the entitlement is valid. (If there are several entitlements expired and the Photocard is expired, the extra check will check the validity of all expired categories)
Once completed click “Save” and move to Alerts:
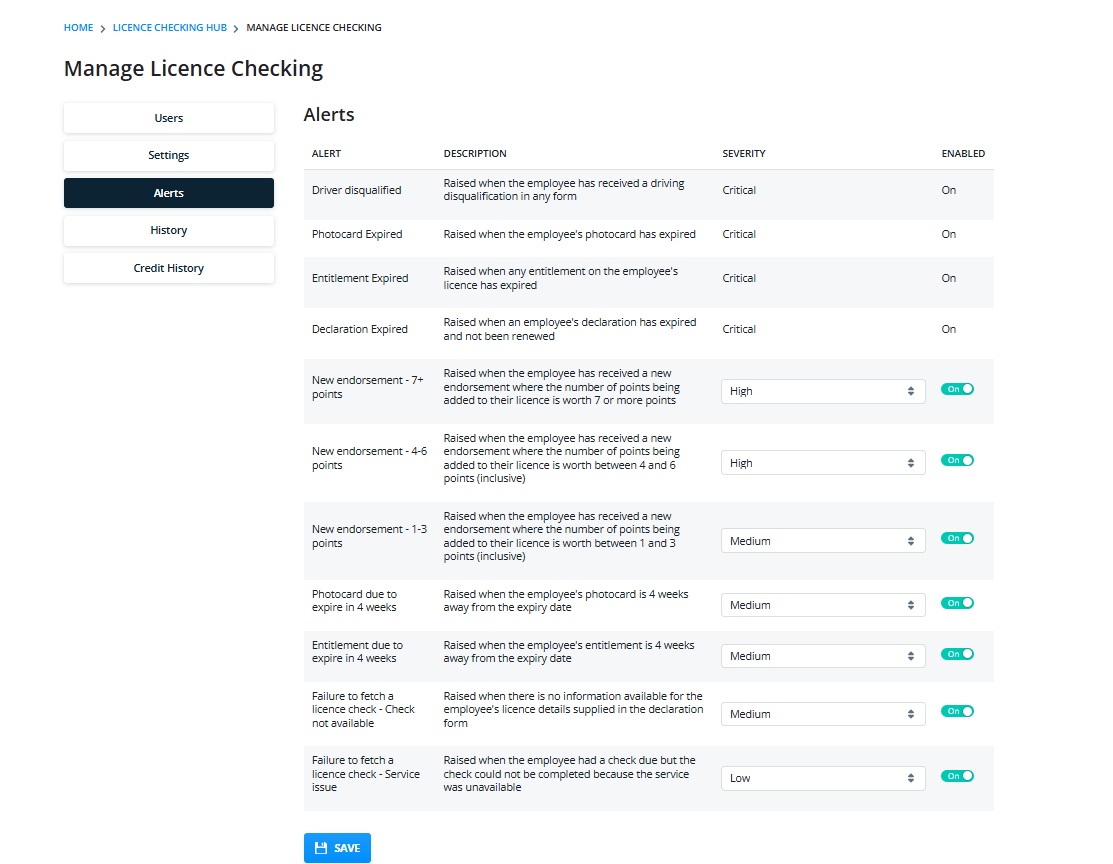
The alerts page displays all those alerts available. The Critical alerts cannot be changed but all others can be turned on or off and their importance adjusted.
Once you have set your alert preferences click “Save”.
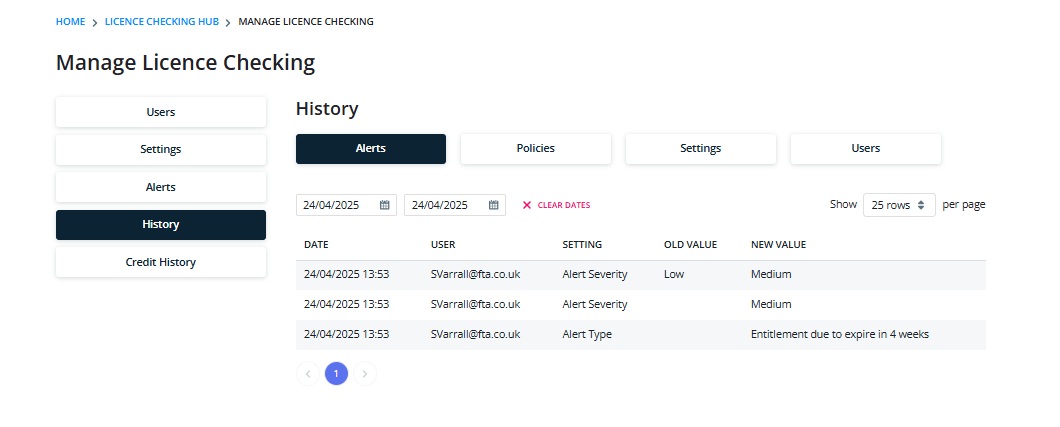
The “History” tab gives a full audit trail of changes made in each of the settings:
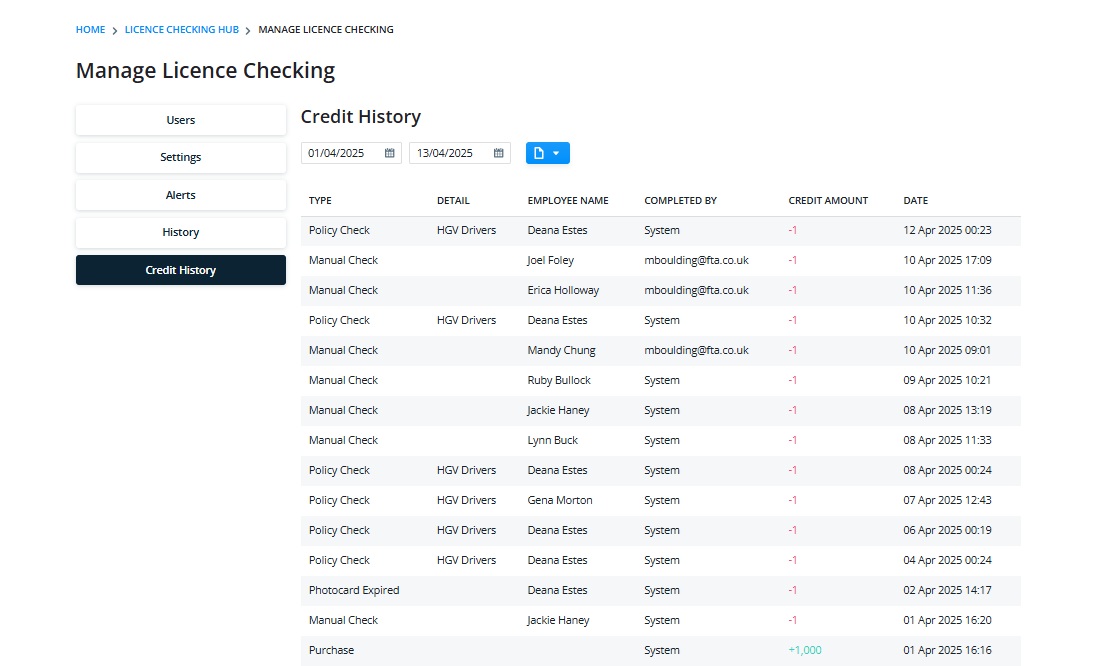
The Credit History will populate with details of who has purchased and used licence check credits:
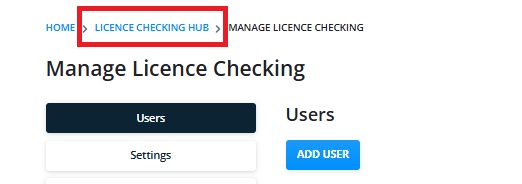
Once all these settings are in place select “Licence Checking Hub” in the navigation at the top of the page:
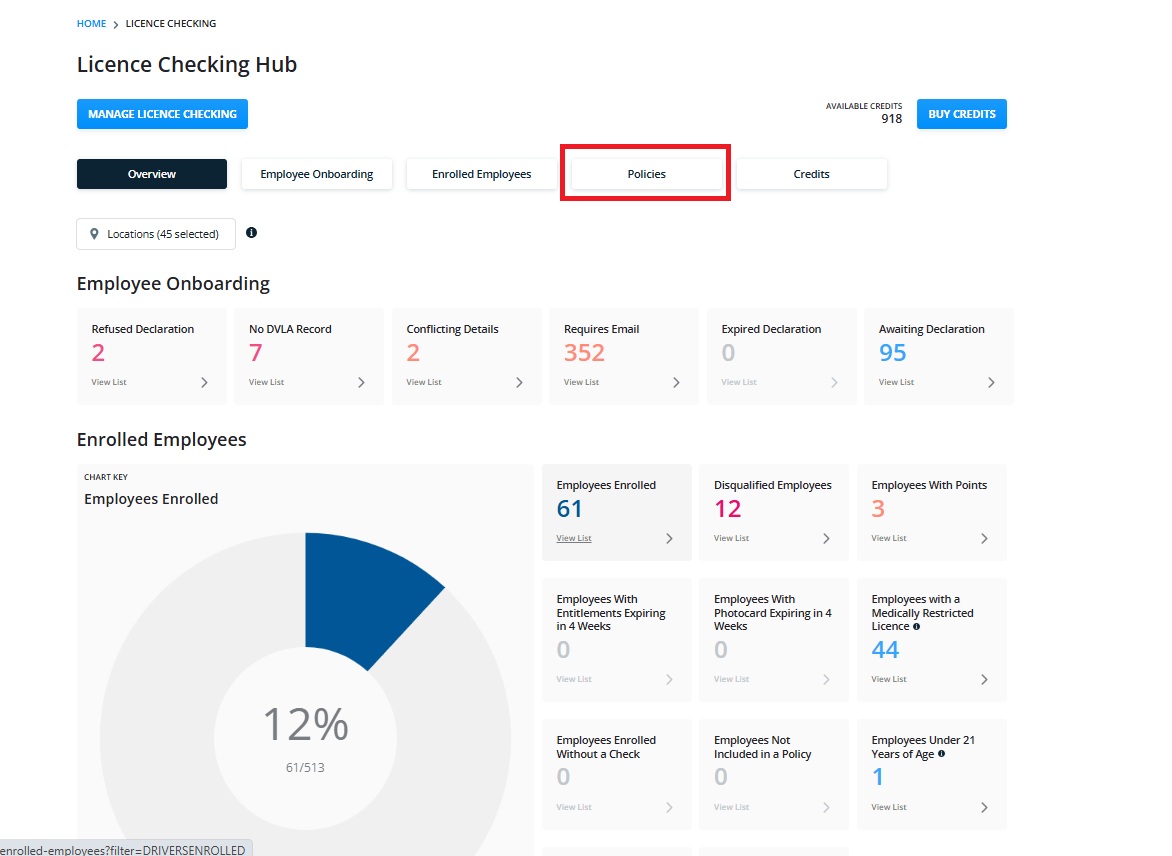
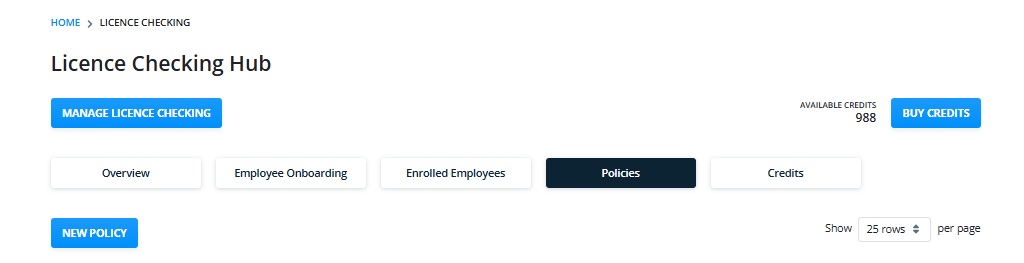
Licence Checking Hub
The next step in your set up is to create licence checking policies. These govern the types of drivers included and how frequently their licences are checked:
Select “New Policy”
And complete the sections:
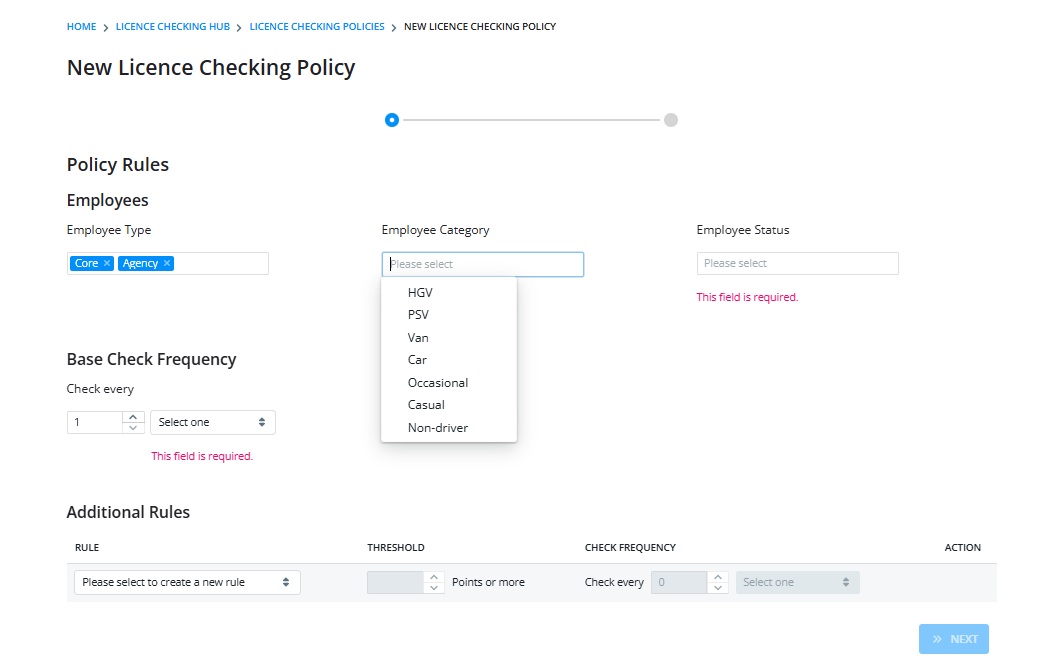
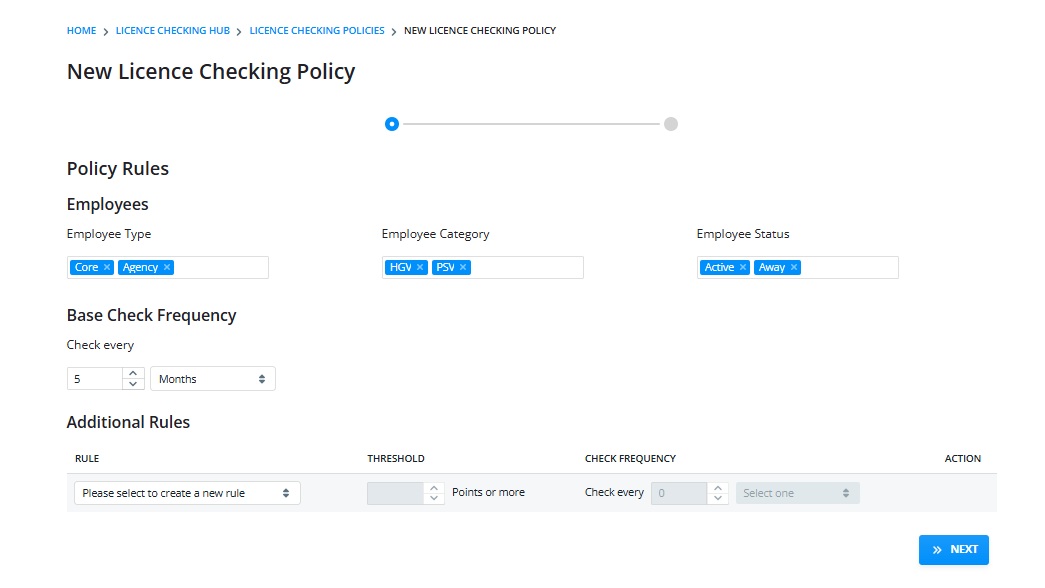
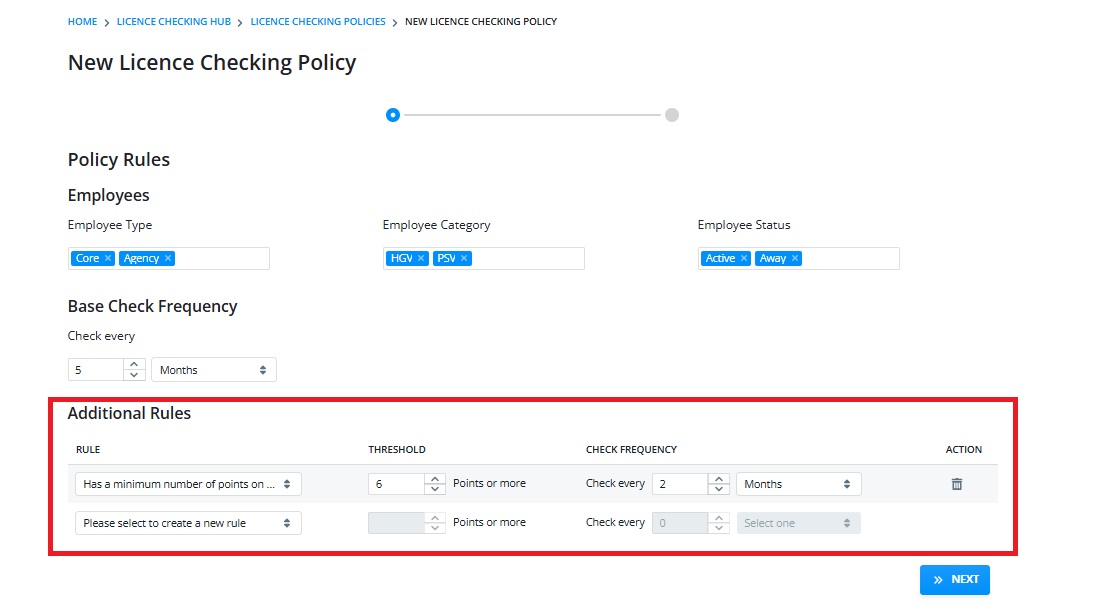
This sets your base policy; however, you can add in extra rules based on the number of points employees have incurred. In this example you may want to check employees with 6 points more frequently than those with 0 points. Use the “Additional Rule” section to add these instructions.
Once completed click “Next” and add your policy name and the date that you would like it to begin and “Save”:
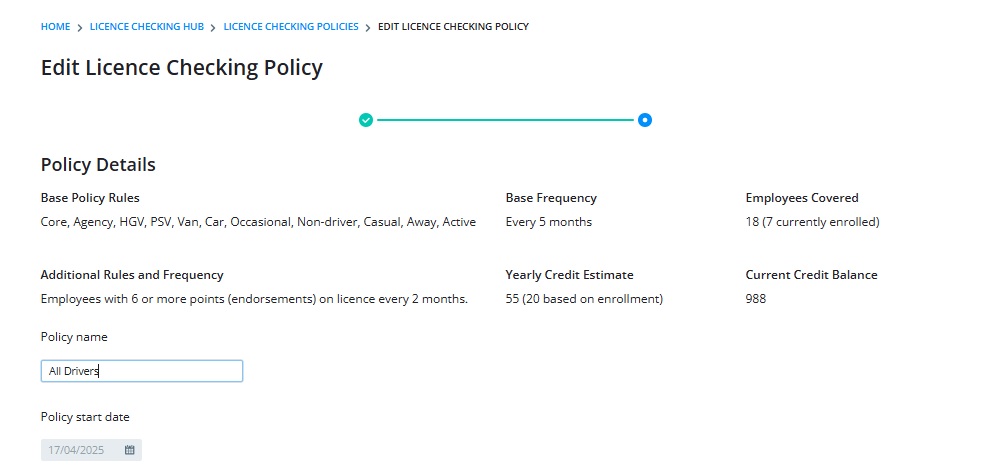
The screen will summarise the policy and show how many employees are covered as well as estimating how many credits will be needed.
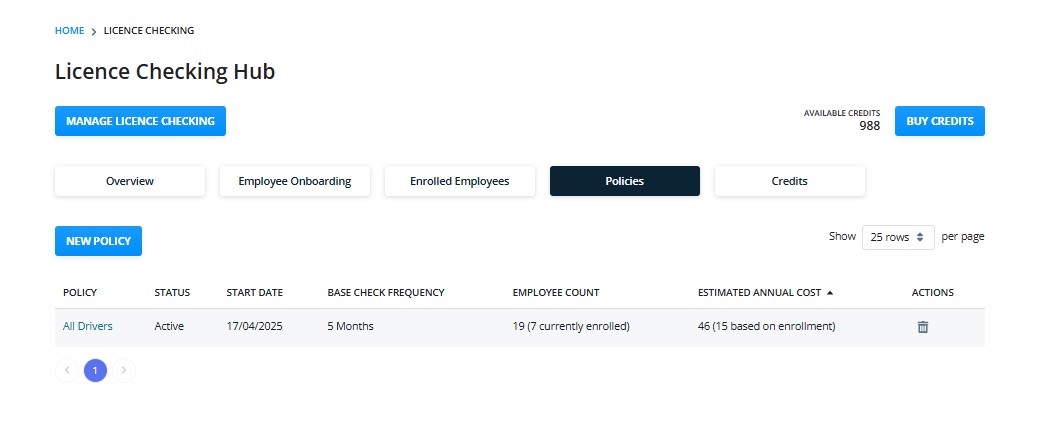
The policy will be displayed in the Policies listing and can be edited by clicking the policy name:
An employee can only be included in one policy.
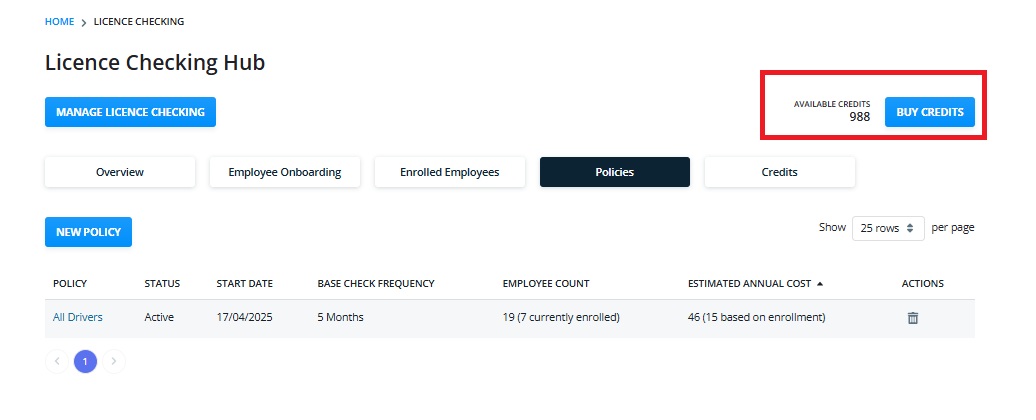
Once your policy/s have been set up, your next step is to purchase sufficient credits to ensure your licence checking requirements are met. You can do this by selecting “Buy Credits”:
The minimum order is 10 credits. Simply move the slider to highlight how many you want to purchase add your Purchase Order Number and click “Submit”.
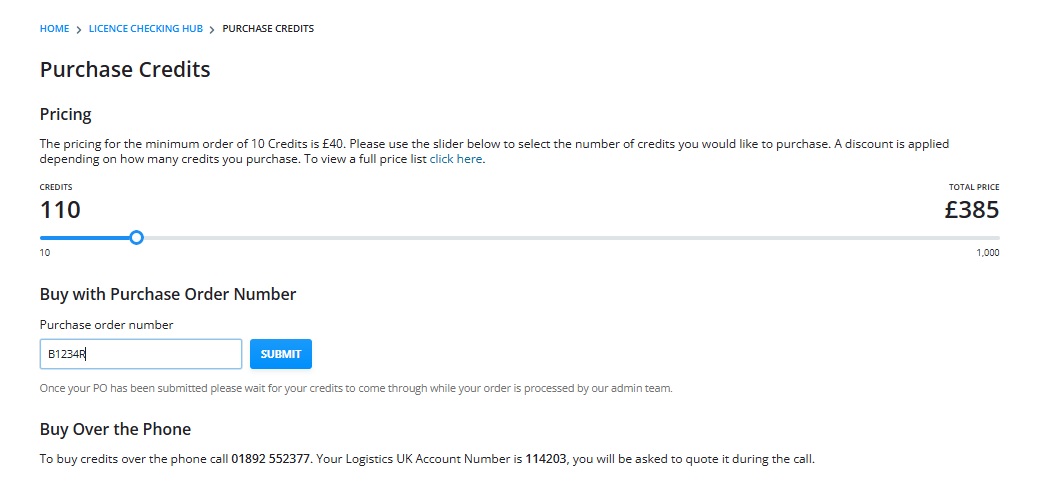
Alternatively, you can purchase checks over the phone.
We will notify you by email if you have less credits available than are needed for your policies. We will also notify you if you have run out of credits.
Full details of your credit usage, history and predicted spend can be seen in the “Credits” tab:
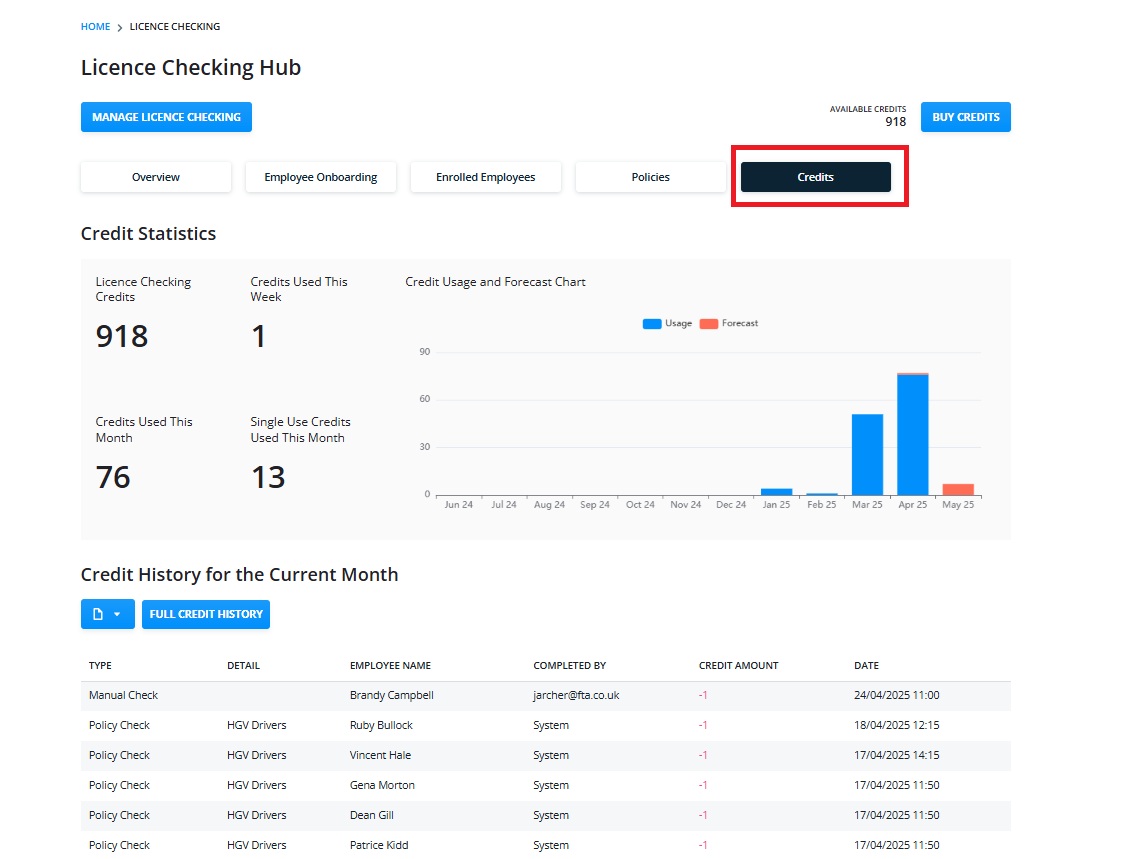
A report can also be downloaded showing your credit history:

Your account is now fully set up for licence checking.
What happens next?
Once your account is set up, those drivers that are included in your policies will receive an emailed declaration form. No checks will take place until this is signed.
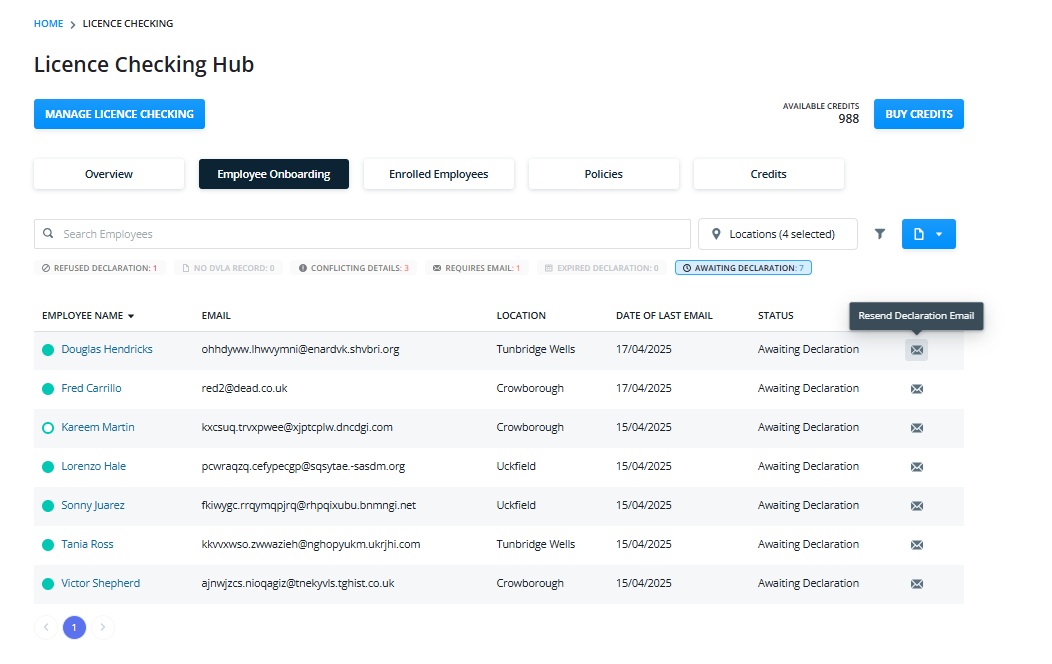
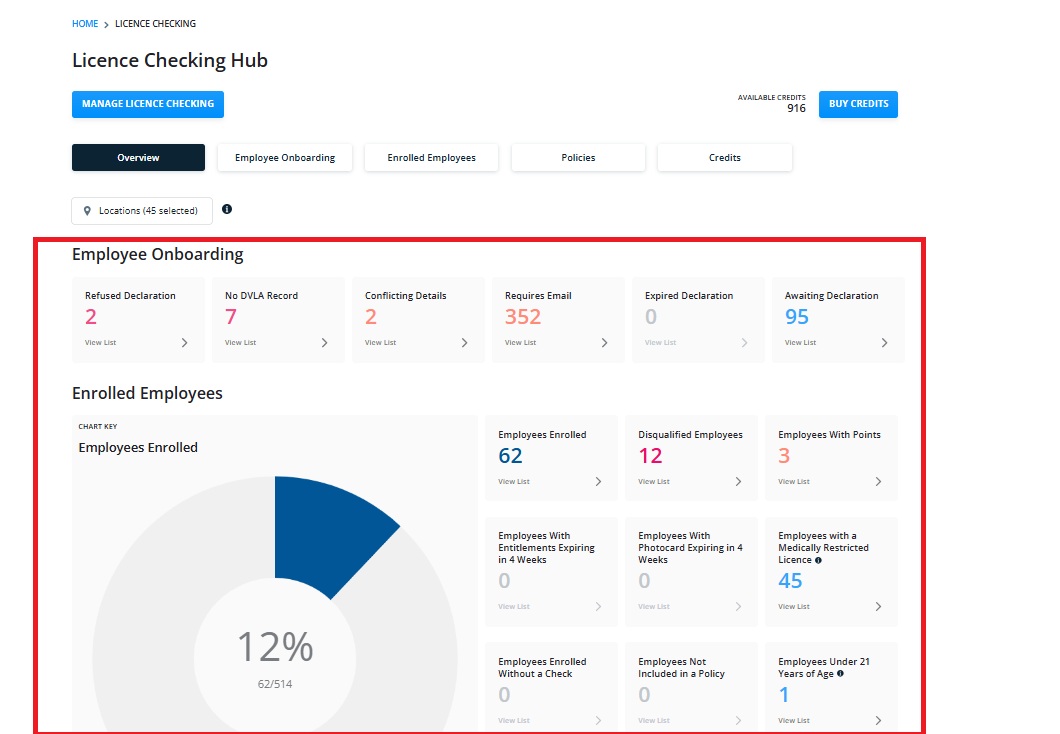
You can monitor the progress of onboarding by viewing the tiles on the Licence Hub page:
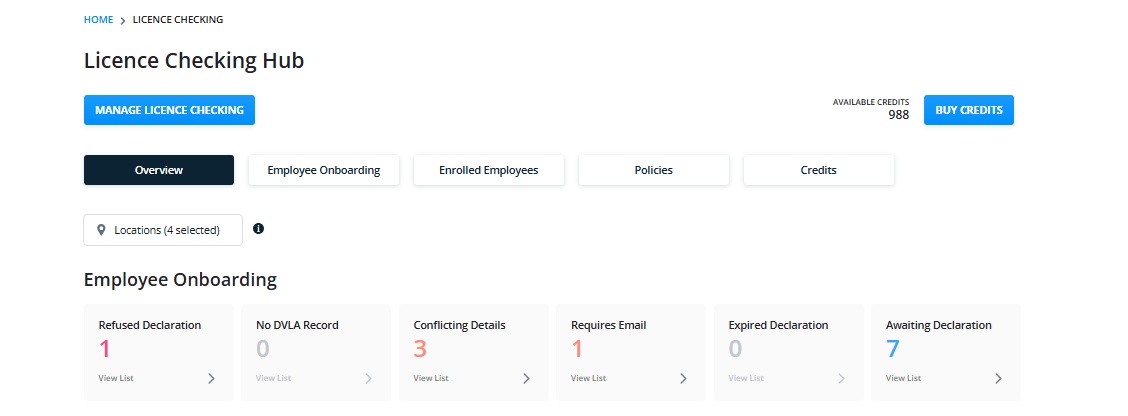
These summarise progress of the declaration process. Clicking on a tile takes you to the onboarding page giving you details of progress along with an associated action:
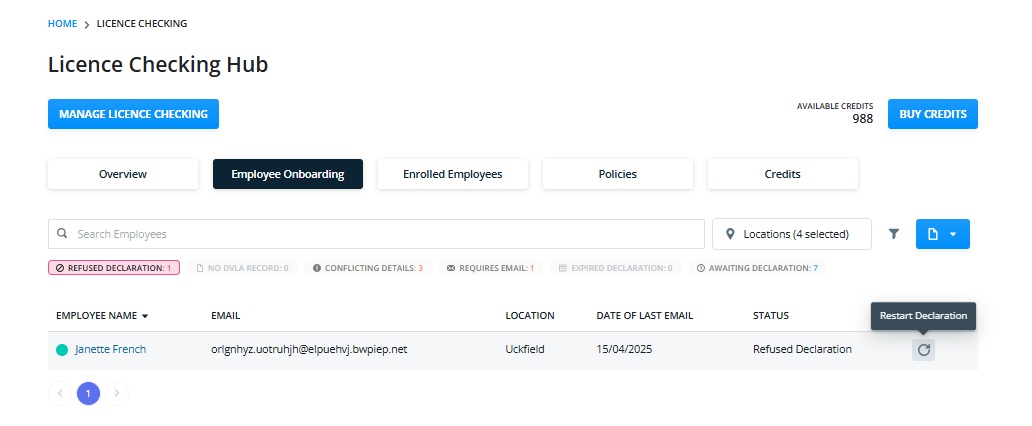
Refused Declaration- This highlights that the driver has refused consent which may require a conversation and then resending the declaration.
No DVLA Record- The licence number the driver has added to the declaration does not exits in the DVLA records. The action associated would be to send another declaration form as the issue could be caused by an incorrect licence number being added.
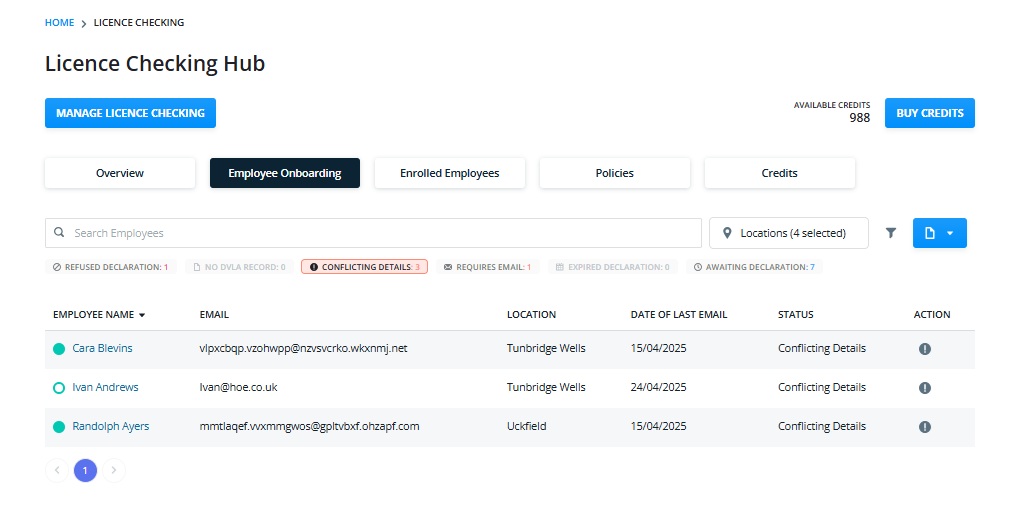
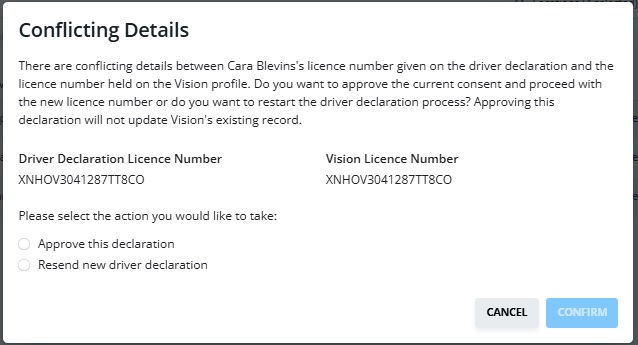
Conflicting details - Where the records at DVLA do not match those added to the declaration. The action allows you to select which is the accurate record. It may require investigation as to why the licence details differ.
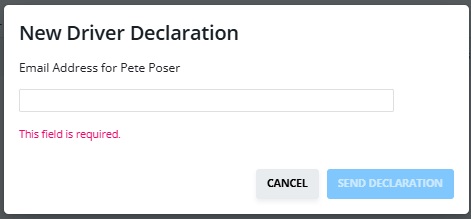
Requires email- An email address has not been added to the driver details. Click the action to add the email address

Expired Declaration- You will be alerted if the declaration has expired which takes place after 3 years although reminders and new declarations will automatically send after the time period added to the settings page.
Awaiting Declaration- Highlights those declarations which have not yet been completed. Employees will automatically receive a reminder to complete it after 7 days, alternatively you can resend it from this page.
Driver Declarations
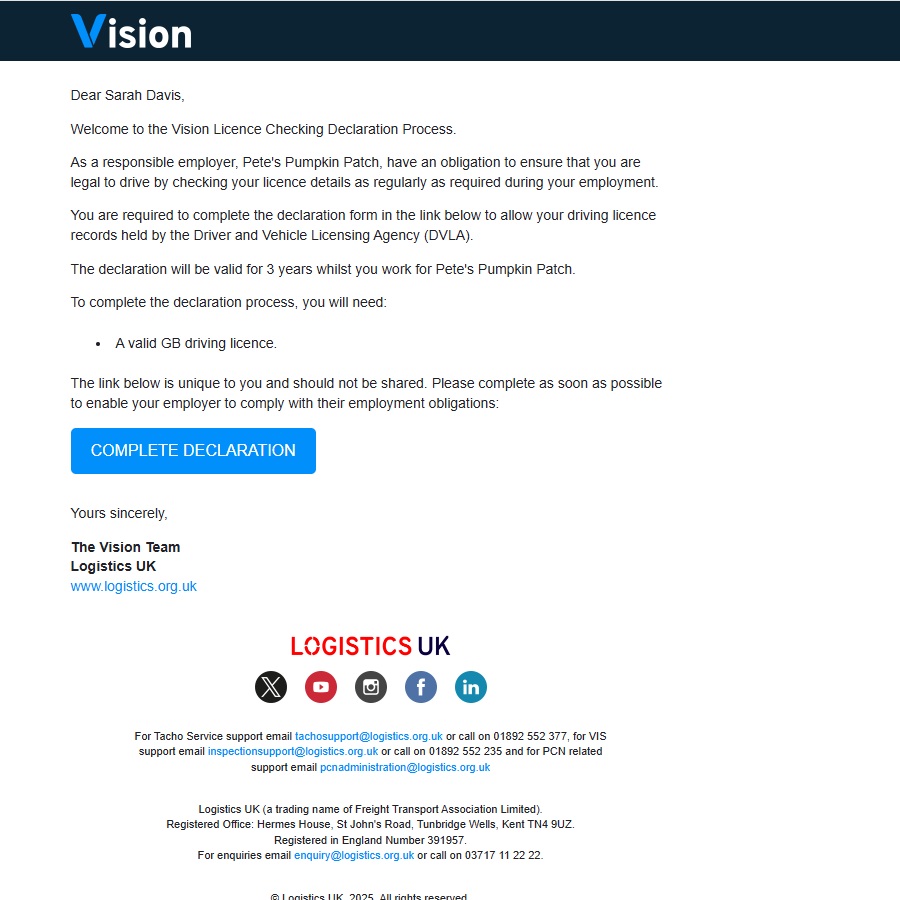
If your employees have been included in a policy and have a valid email address, they will receive an email from Vision containing the driver declaration:
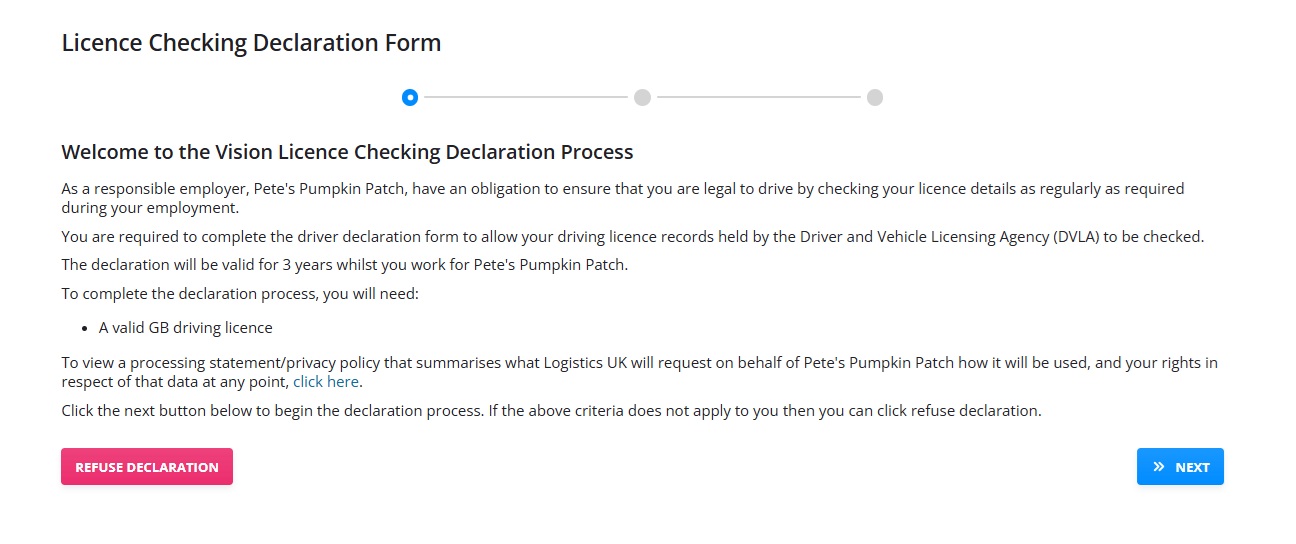
If they refuse the declaration, you will be notified via the Licence Hub, Employee onboarding section.
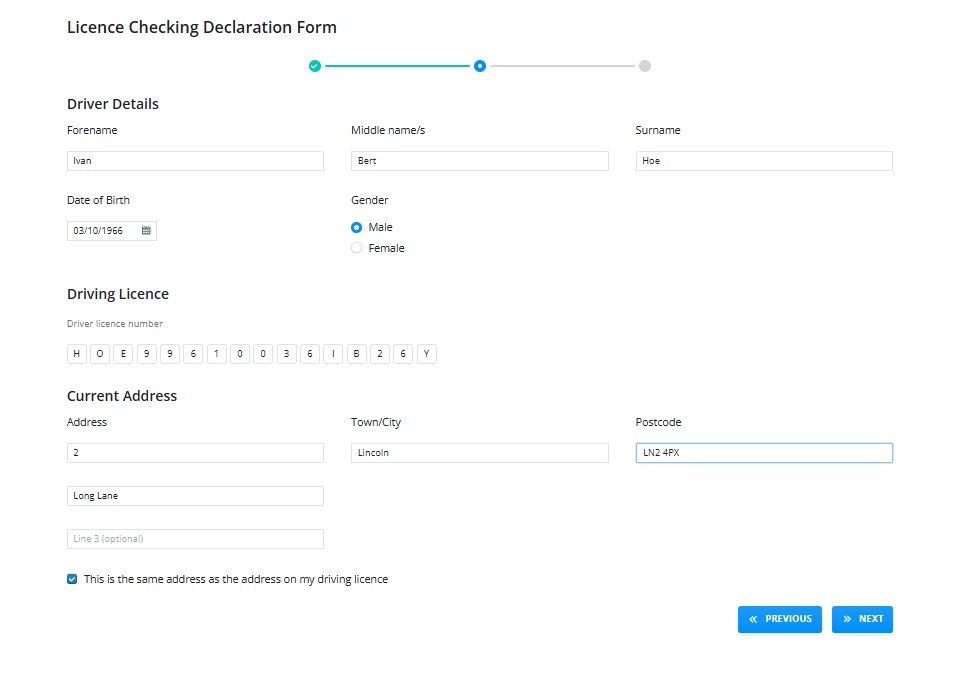
If they continue to the declaration, their licence number will start to build as they add name, date of birth and sex. Only the last 3 digits need to be added manually. We would strongly recommend that the driver checks this to ensure it matches their current licence:
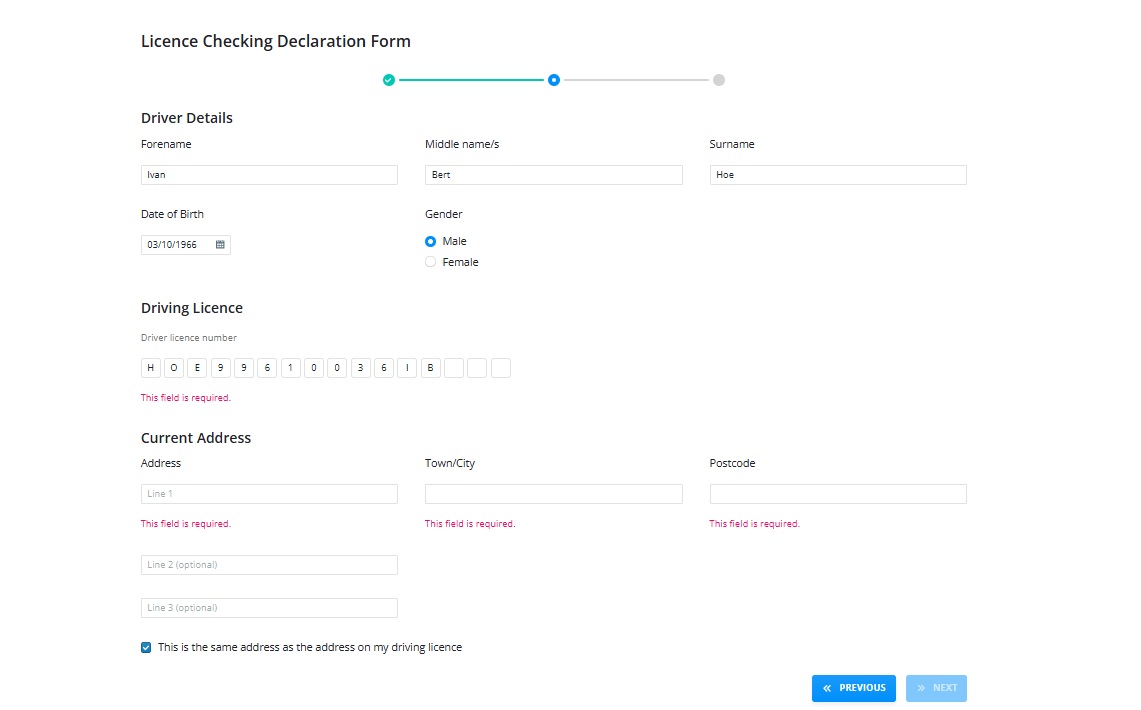
The employees then complete their address:
And signs the declaration
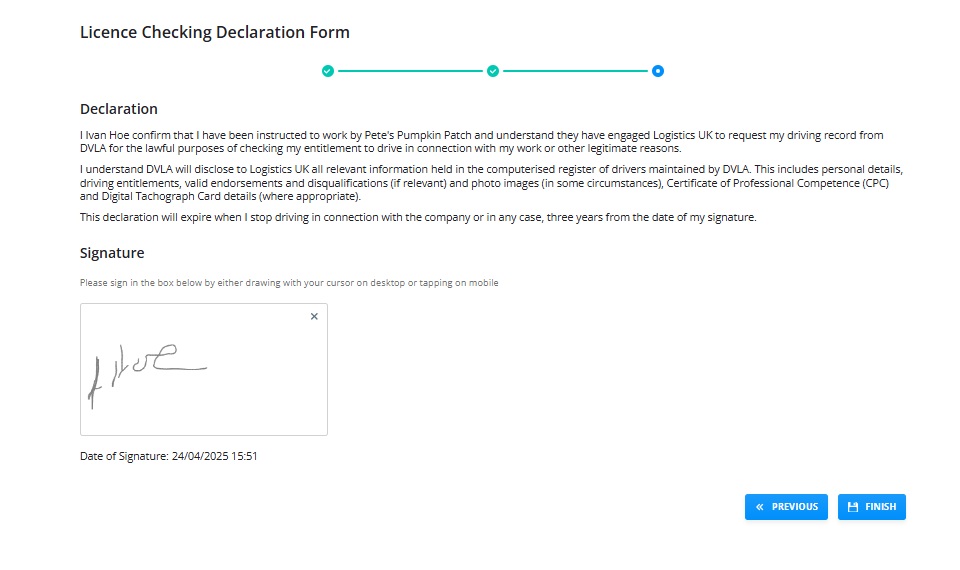
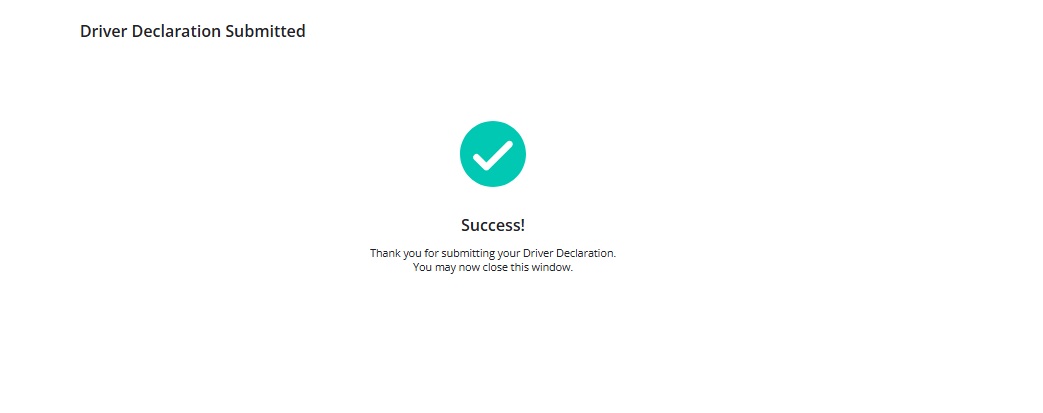
The declaration will remain active for 3 years or until the driver is made inactive.
Inactive Driver
When a driver is made inactive, their consent will end. Their licence checking data will remain on the system for 30 day and will then be removed automatically. Alternatively, you can remove the data earlier:
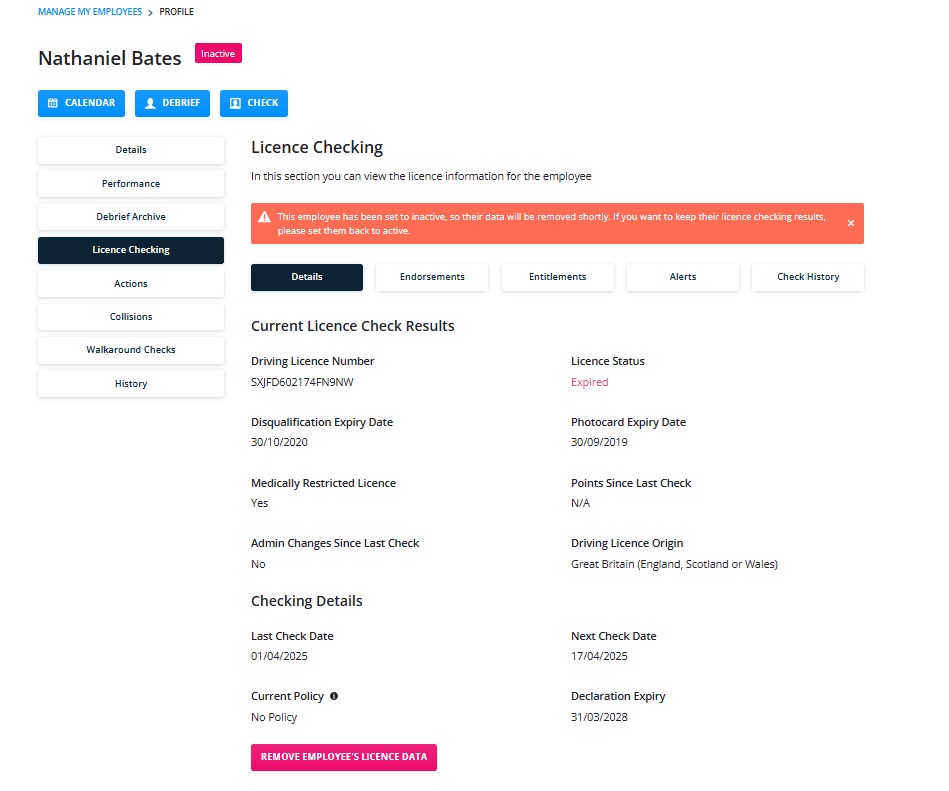
Please be aware, if the driver is reactivated then the driver will need to complete a new declaration which will be sent to them automatically, provided they are included in a policy and have a valid email address.
Enrolled Employees
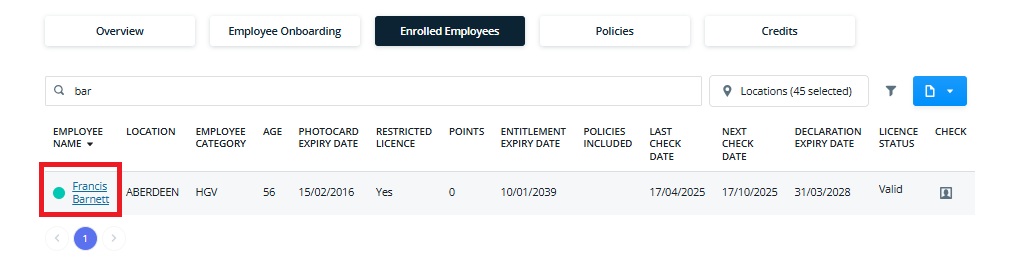
This section of the hub shows progress and results for those employees who have returned correctly completed declarations. The main page highlights the results in the tiles and in the pie chart:
Clicking a tile takes you to the detailed “Enrolled Employee” screen:

Click the filter icon to show drivers with specific results:
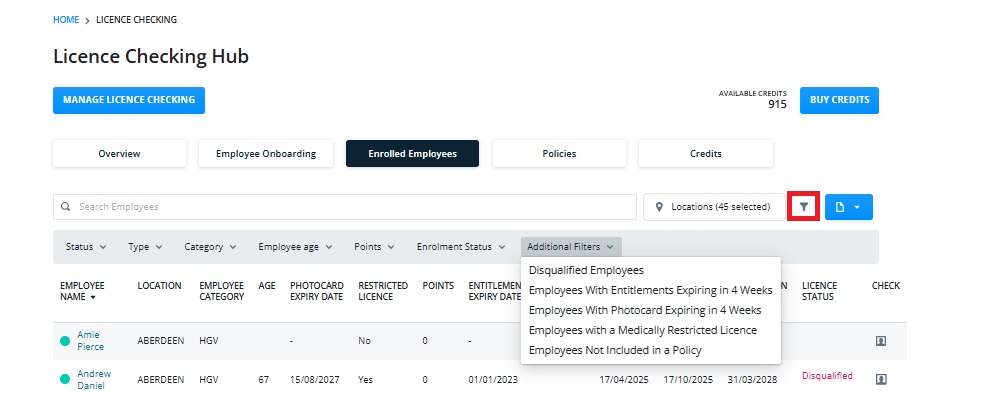
If you have permissions, you can also carry out a manual check by clicking the icon highlighted below:
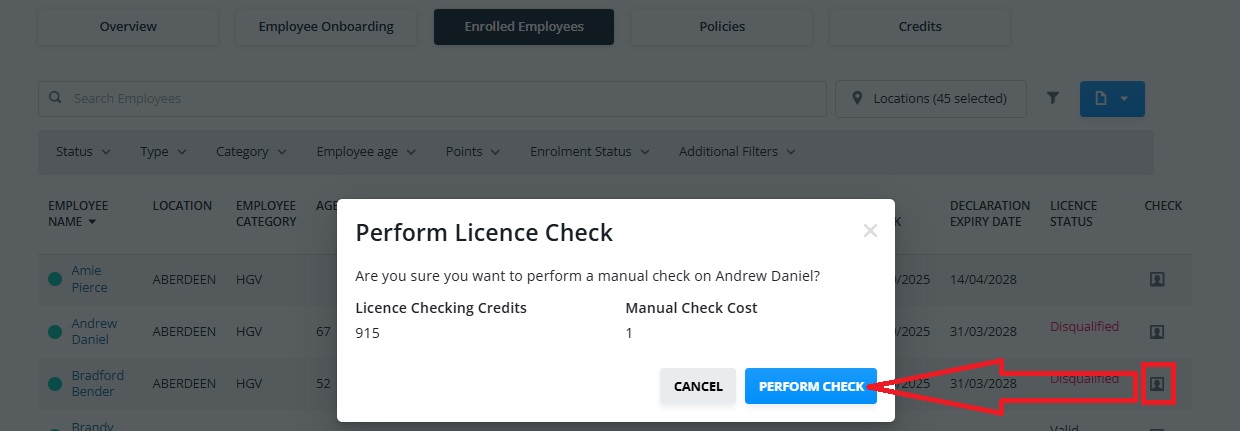
You might use this if a driver has explained that something has changed on their licence since their last scheduled check. Performing a manual check will bring their results up to date. You might also use this for those employees that aren’t part of a policy.
You can only perform a manual check if:
- A scheduled check has not taken place in the last 24 hours
- If you have permissions to do so
- If you driver has signed their declaration
Manage My Driver and Profile pages
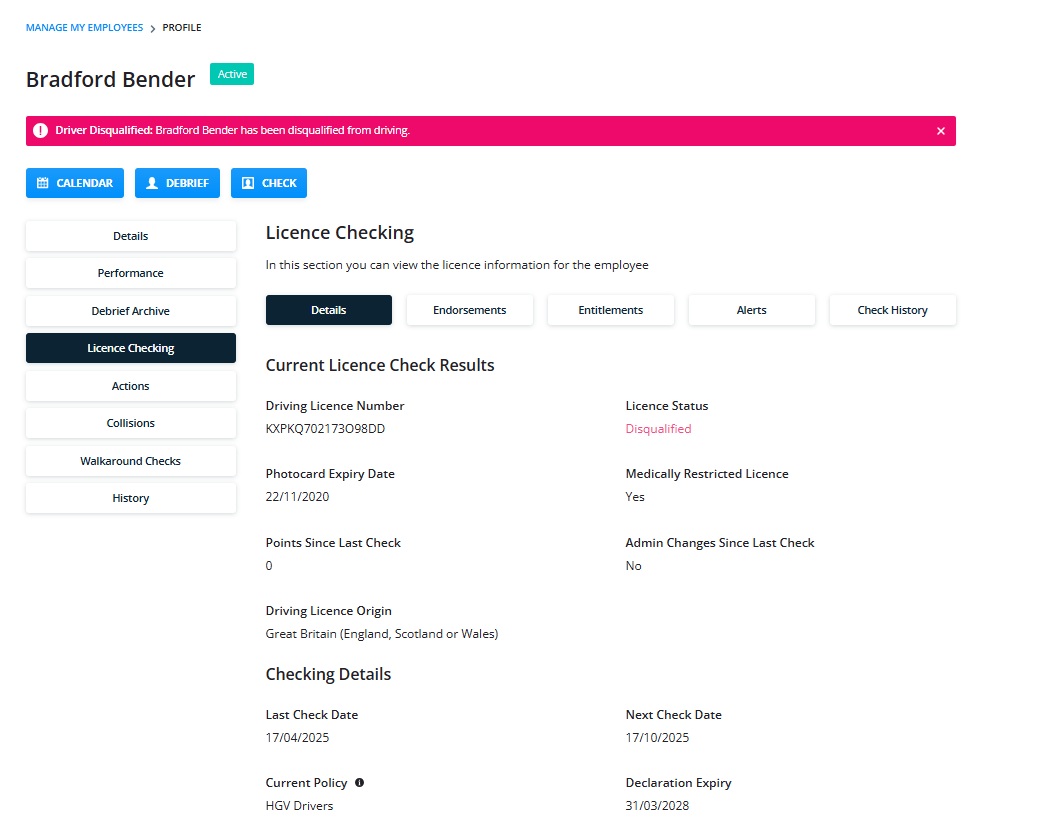
Clicking on an employee’s name in any of the Licence hub pages, will link you to their profile:
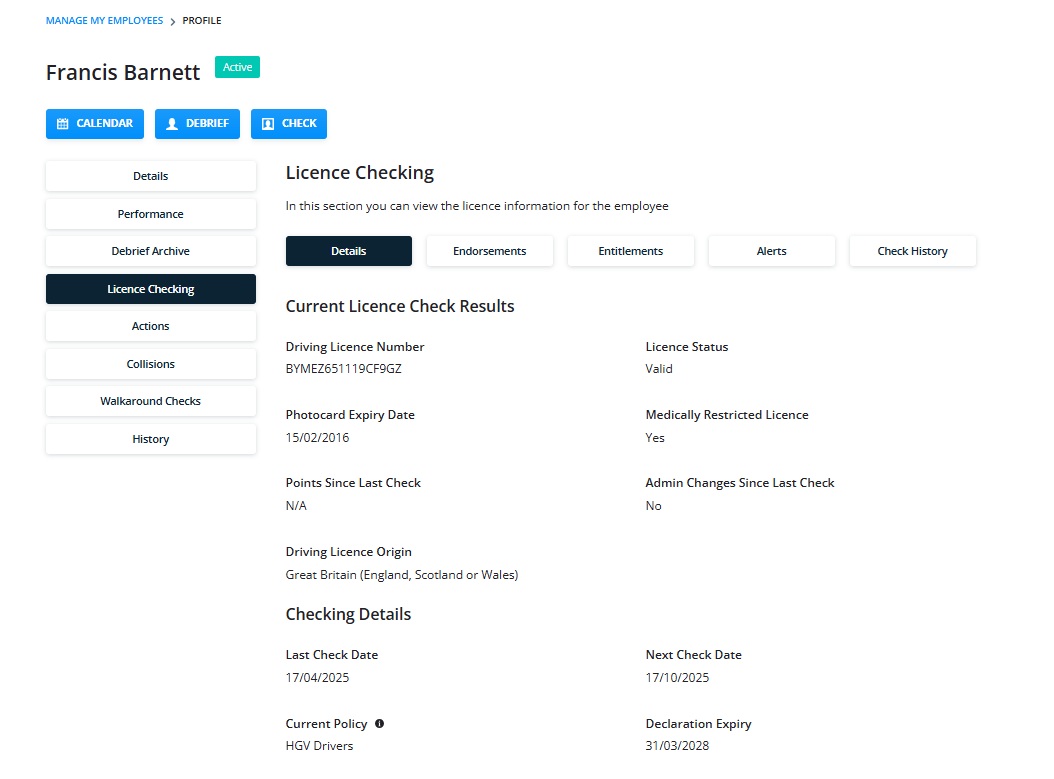
General details will be shown for those with permission to see the information.
Any points incurred will display under the Endorsement tabs together with the dates incurred and expired
Driving entitlements will show under the next tab:

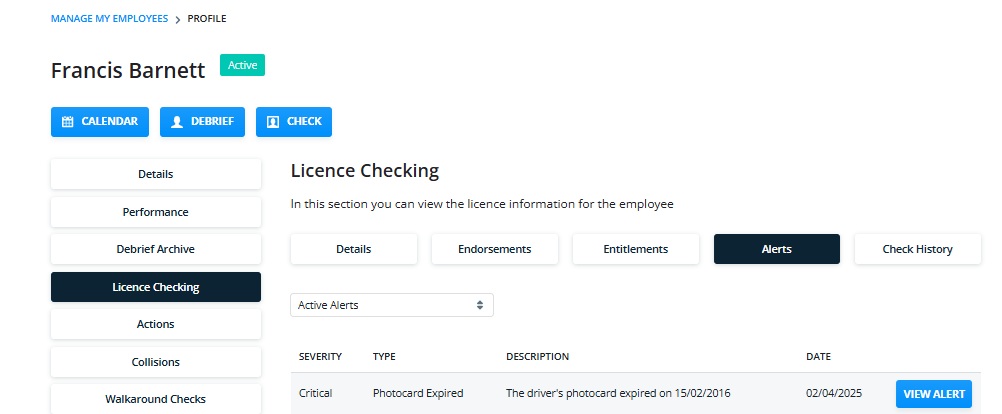
Alerts relating to the driver will be displayed in the tab with a link to the alerts screen:
Finally, the Check history allows you to see previous checks for that employee:

If a driver has been disqualified this will be clearly labelled across the profile:
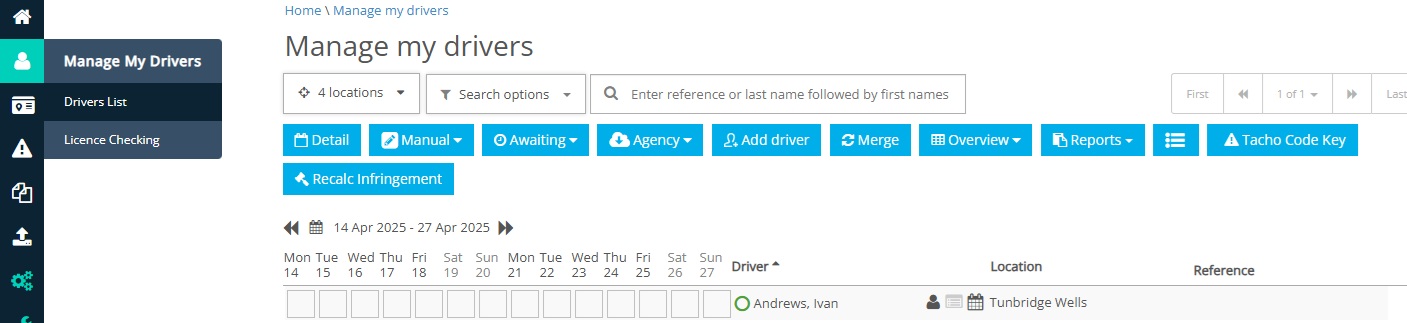
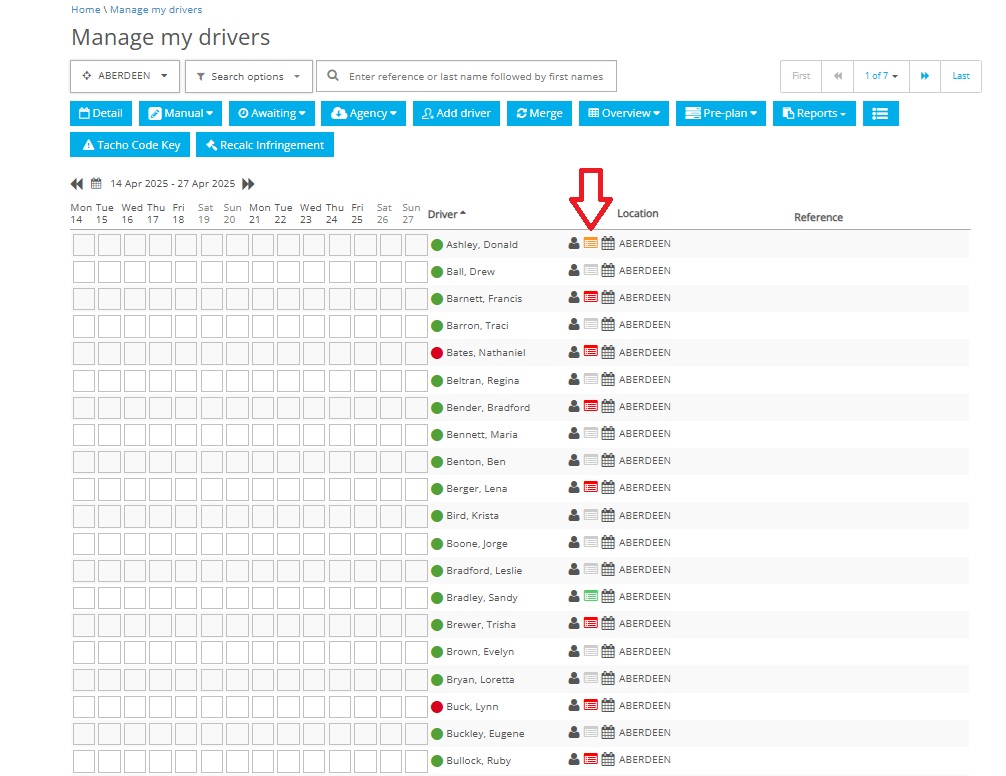
The Manage my Driver page includes an extra icon that will be highlight in green, amber or red depending on whether the driver has any alerts or points. Clicking the icon takes you directly to the drivers Licence Checking profile. If the icon is “Greyed out” it means that the driver has not had a licence check.
Alerts
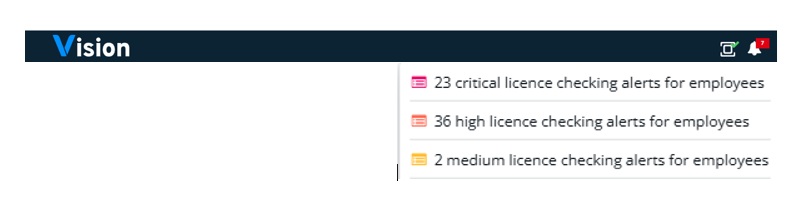
Licence checking alerts are shown under the bell illustrated below:
Clicking any of these will take you to the detail:
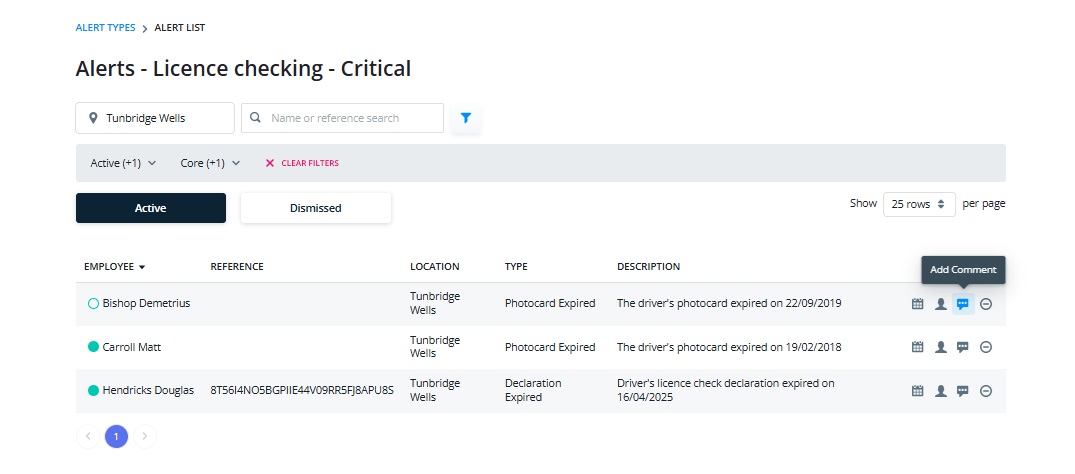
You can link to the drivers’ profile, dismiss the alerts or add a comment to it.
